 Save to Pinterest
 My sister called three days before Thanksgiving asking if I could bring something that would make people smile when they walked through the door. I was elbow-deep in sourdough experiments that week, and suddenly the idea hit me like a gift: why not shape a loaf into a turkey? The first attempt was lopsided and awkward, but when it came out of the oven golden and somehow dignified despite its wonky proportions, the whole kitchen smelled like possibility. That loaf became the thing everyone remembered more than the actual turkey that year.
I've baked this bread for potlucks, holiday dinners, and even once just to cheer up a friend who'd had a rough week. There's something about pulling a turkey-shaped loaf from the oven while everyone's gathered in the kitchen that shifts the whole mood of a gathering. People start taking photos before they even think about eating it, and somehow that feels exactly right.
Ingredients
- Bread flour: Use a high-protein flour (12-13% protein) because it gives you the structure to hold your turkey shape without it slouching in the oven.
- Water: Room temperature water lets your starter wake up gently; cold water confuses it.
- Active sourdough starter: Make sure yours is bubbly and doubling every 4-6 hours before you use it, or the whole timeline falls apart.
- Fine sea salt: Don't skip this or rush adding it; it takes about 10 minutes to fully incorporate.
- Black olives or peppercorns: These are your turkey's eyes, so position them with intention.
- Red bell pepper or dough scraps: The wattle is what makes people say "oh, that's a turkey" instead of "that's a lumpy bread."
- Egg wash: Optional but transforms the crust from matte to glossy and gorgeous; use plant milk if you're keeping it vegan.
- Seeds: Poppy, sesame, or flax seeds scattered like feathers add texture and visual charm.
Tired of Takeout? 🥡
Get 10 meals you can make faster than delivery arrives. Seriously.
One email. No spam. Unsubscribe anytime.
Instructions
- Mix flour and water, then wait:
- Combine flour and water in a large bowl and let it sit covered for 30 to 45 minutes. This autolyse step lets the flour fully hydrate, which means less mixing later and better gluten development. Your dough will look shaggy and rough, and that's exactly what you want.
- Bring in the starter and salt:
- Stir in your active starter and salt until everything is fully combined and there are no dry flour streaks. It'll take about 5 minutes of mixing; don't rush it or the salt won't distribute evenly.
- Stretch and fold to build strength:
- Over the next 2 hours, perform 3 to 4 sets of stretch and folds at 30-minute intervals. Wet your hand, grab one side of the dough, stretch it up and fold it over the center, rotate the bowl, and repeat from all four sides. This builds gluten without traditional kneading.
- Let it bulk ferment until bubbly:
- Cover and leave the dough at room temperature (21 to 23°C or 70 to 74°F) for 5 to 7 hours, until it has roughly doubled in size and has visible bubbles underneath and on top. This is where the sourdough tang develops, so don't skip this time by using heat.
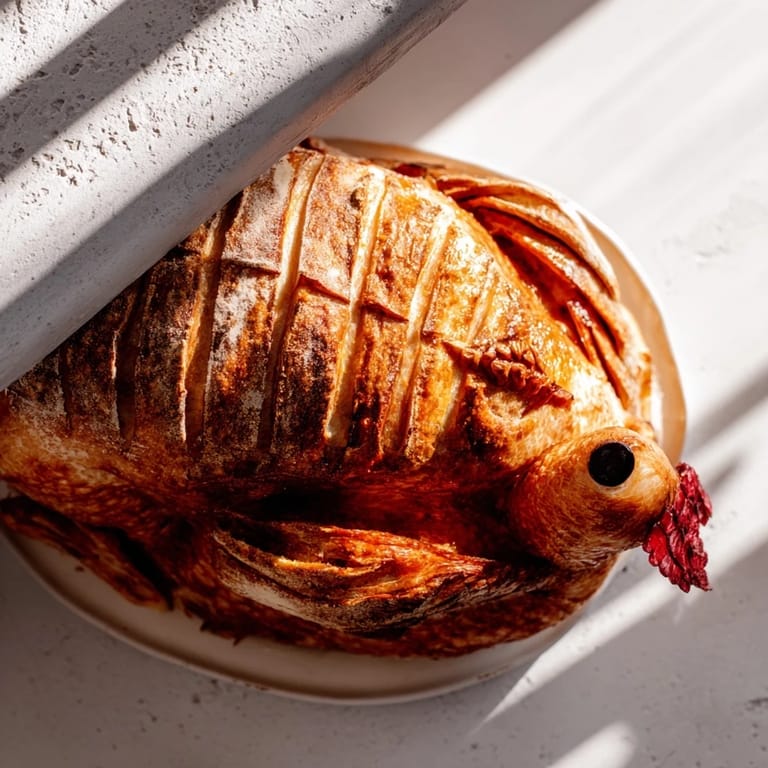
- Shape your turkey:
- Turn the dough onto a lightly floured surface and gently divide it into pieces: a large oval for the body, a smaller round for the head, and several teardrop shapes for tail feathers and wings. Be gentle; you're not trying to deflate all the air you just built up. Assemble everything on a piece of parchment paper, using a tiny dab of water to glue pieces together.
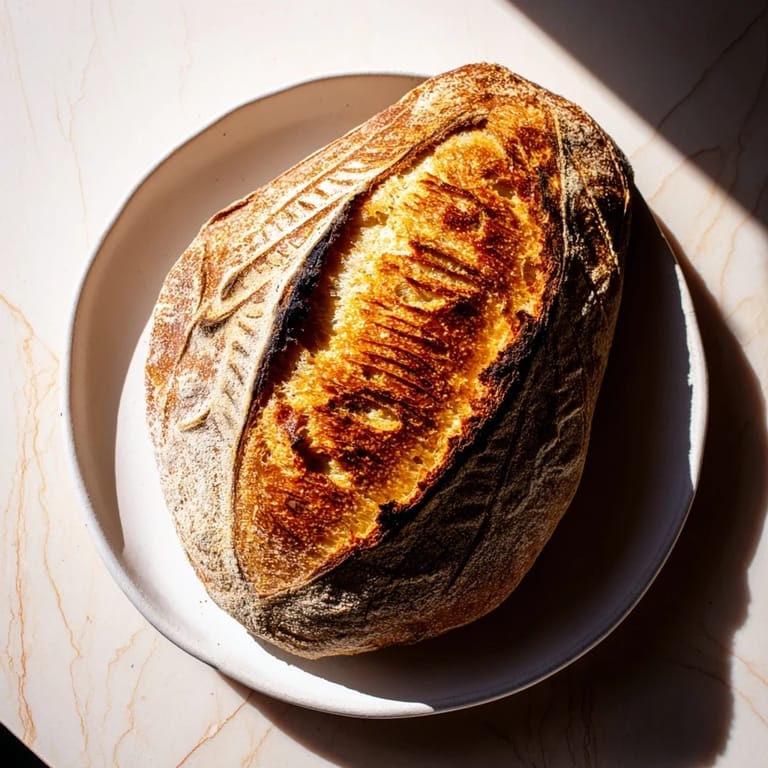
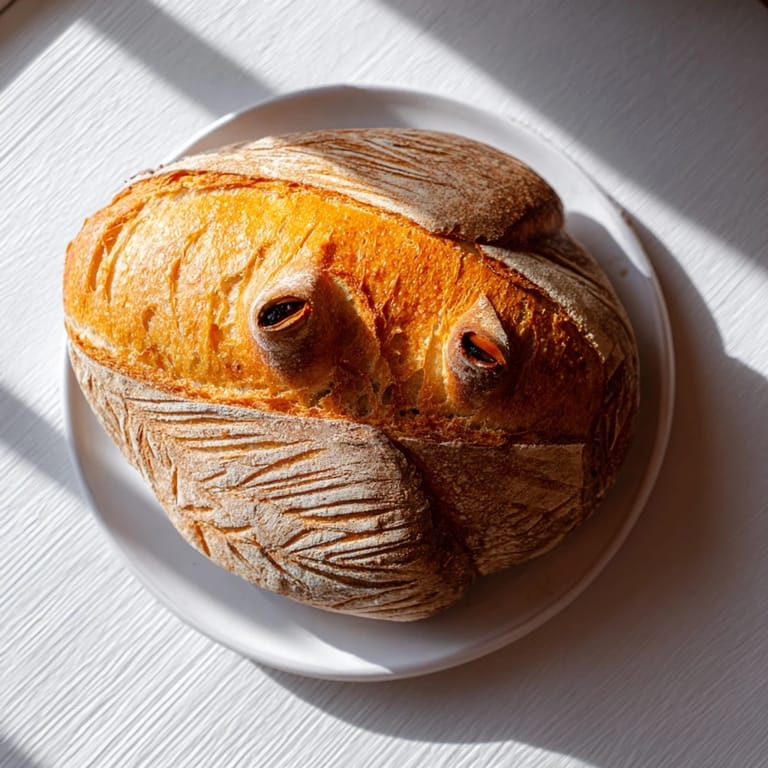
- Score and decorate:
- Use a sharp knife or bread lame to score feather details onto the tail and wings. Now add your olives or peppercorns for eyes and shape a small wattle from a piece of red bell pepper or reserved dough. This is the moment where bread becomes a turkey.
- Final proof until puffy:
- Cover loosely and let the shaped turkey sit at room temperature for 1 to 2 hours until it looks slightly puffy but not overproofed. Poke it gently; it should spring back slowly but not completely.
- Preheat with a stone:
- Get your oven to 230°C (450°F) with a baking stone or steel inside. This takes about 45 minutes to fully preheat. A hot stone is what gives you that spectacular oven spring and crispy crust.
- Egg wash and seeds (optional):
- Brush the assembled turkey gently with egg wash or plant milk, then sprinkle seeds over the "feathers." This step is optional but worth it if you want that magazine-worthy shine.
- Bake with steam, then without:
- Slide your turkey (still on parchment) onto the preheated stone. Bake for 20 minutes with steam (you can throw an ice cube on the stone or use a Dutch oven), then reduce heat to 200°C (400°F) and bake for another 20 minutes without steam until the crust is deep golden brown and the loaf sounds hollow when you tap the bottom.
- Cool completely:
- Transfer to a wire rack and let it cool completely before slicing or serving. This takes about an hour, and it's torture waiting, but the crumb still sets during this time.
 Save to Pinterest
 The first time someone at a dinner party recognized my turkey bread before I even had to explain it, I felt like I'd unlocked something. It's not just food at that point; it's a conversation starter, a moment where people slow down and actually notice what's in front of them. That feeling never gets old.
Timing and Patience
This bread demands patience in the most satisfying way. The bulk fermentation takes 5 to 7 hours because that's when sourdough develops its character and tang, not because anyone's trying to make your life inconvenient. I've learned to start this bread in the morning, run errands, come back to a bubbly dough that's ready to shape, and have it on the table by evening. Once you stop fighting the timeline and work with it, the whole process feels almost meditative.
Flavor Variations to Explore
This dough is forgiving enough to play with if you want to take it further. I've added fresh rosemary and thyme to the dough itself, which makes every slice smell like a holiday dinner. Another time I mixed in cracked pepper and a tiny pinch of everything bagel seasoning to the dough, which sounds weird but was absolutely the right call. The sourdough's tang plays beautifully with herbs, so if you're feeling creative, the turkey shape isn't the only place to experiment.
Serving and Storage Ideas
A turkey loaf looks stunning as a table centerpiece long before anyone cuts into it, which is genuinely one of my favorite things about it. You can serve it warm with butter alongside soup, alongside a cheese board, or even just on its own because the crust and crumb are doing all the talking. Leftovers toast beautifully for a few days, and day-old slices are perfect for sandwiches or just tearing off to snack on.
- Store it cut-side down on a bread board to keep the exposed crumb from drying out too fast.
- It freezes perfectly well for up to a month, so you can make it weeks ahead of a gathering.
- Reheating in a 150°C oven for 10 minutes revives the crust if it's lost its crackle.
 Save to Pinterest
 Making a turkey-shaped sourdough is the kind of thing that sounds complicated until you actually do it, then it feels like the most natural expression of bread baking possible. You've made something beautiful and delicious that tells its own story the moment it hits the table.
Questions & Answers
- → How long does the fermentation process take?
The total time is 11–13 hours. This includes 30–45 minutes of autolyse, 2 hours of stretch and folds, 5–7 hours of bulk fermentation, and 1–2 hours of final proofing. The extended fermentation develops flavor complexity and creates the characteristic tangy crumb.
- → Can I make this loaf without eggs?
Yes, this loaf is naturally vegan-friendly. Simply skip the egg wash or brush the assembled dough with plant-based milk for a subtle shine. The bread will still develop a beautiful golden crust from the baking process.
- → What makes the shape stay defined during baking?
Proper scoring with a sharp knife or lame helps define the feather details and prevents uncontrolled expansion. The shaped components are assembled securely using small amounts of water, and adequate proofing ensures the dough is ready without over-fermentation, which would cause the turkey form to lose definition.
- → Why is preheating the baking stone important?
A thoroughly preheated stone or steel ensures immediate heat transfer to the dough's bottom, creating excellent oven spring and a crisp crust. This is especially important for artisan sourdough, as it helps achieve the contrast between the crusty exterior and soft interior.
- → Can I add flavoring herbs to the dough?
Absolutely. Rosemary and thyme work beautifully in the dough, adding aromatic depth that complements the tangy sourdough flavor. Mix dried herbs into the flour before combining with water, or use fresh herbs by adding them during the mix phase for a more subtle infusion.
- → How should I store the finished loaf?
Cool completely on a wire rack before storing. Keep the bread in a paper bag or bread box at room temperature for 2–3 days to maintain the crispy crust. For longer storage, wrap tightly and freeze for up to two weeks. Refresh frozen bread in a 180°C oven for 10–15 minutes before serving.