 Save to Pinterest
 There's something about a breakfast that actually requires effort that makes you feel like you've accomplished something before 9 a.m. I stumbled onto these breakfast bites during a chaotic Sunday morning when I was trying to impress my sister's new boyfriend, and I realized I had most of the ingredients scattered around the kitchen. What started as me nervously rolling out tortillas turned into this golden, crispy pocket of eggs, bacon, and cheese that everyone kept reaching for. The beauty of them is that they're substantial enough to feel homemade but practical enough to grab on your way out the door.
I still remember my mom walking into the kitchen halfway through assembly, watching me carefully place that first spoonful of egg mixture into the center of a tortilla, and saying, "Oh, you're making breakfast burritos," like it was obvious. I'd been overthinking it for weeks, but seeing her casual confidence made me realize this was just food, and food made with your own hands always turns out pretty good. That first batch came out of the oven looking restaurant-quality, which surprised me, and suddenly these weren't just breakfast anymore—they were proof that I could do something a little more interesting on a Sunday morning.
Ingredients
- All-purpose flour: The foundation of your tortillas—don't overthink the brand, but make sure it's fresh because old flour changes how the dough feels.
- Warm water: It needs to be warm, not hot, because hot water will make the dough tough and uncooperative.
- Vegetable oil: Brings tenderness to the dough; I've learned this makes the difference between tortillas that crack and ones that fold.
- Frozen hash browns: Thaw them first and squeeze out any excess moisture, or they'll make everything soggy inside.
- Bacon: Cook it until it's genuinely crispy, then let it sit on paper towels—greasy bacon will seep into everything.
- Large eggs: Room temperature eggs scramble more evenly, a small detail that matters more than it sounds.
- Sharp cheddar cheese: The sharpness cuts through the richness of the eggs and bacon in a way mild cheese doesn't.
- Butter: Melted and used sparingly for browning the hash browns and brushing the finished bites.
Tired of Takeout? 🥡
Get 10 meals you can make faster than delivery arrives. Seriously.
One email. No spam. Unsubscribe anytime.
Instructions
- Make the dough and let it rest:
- Mix your flour and salt together, then drizzle in the oil slowly while stirring—it'll look shaggy at first. Add warm water a little at a time until you have a soft, slightly sticky dough, then knead it for a few minutes on the counter until it becomes smooth and elastic. The resting time matters; those 10 minutes actually make rolling easier.
- Roll and cook the tortillas:
- Divide the dough into 12 pieces and roll each one into a thin circle—they should be flexible, not brittle. Cook them on a hot, dry skillet for about a minute per side until they just begin to brown; they'll continue cooking later, so don't overdo it here. Stack them under a clean towel to keep them soft and pliable while you work through the filling.
- Cook the bacon and hash browns:
- Get your bacon crispy in a large skillet, then set it aside and chop it roughly. Melt a little butter in that same skillet, add the thawed hash browns, and let them sit and brown for a minute or two before stirring—this develops flavor and texture instead of just steaming them. The whole thing takes about 5-7 minutes; you want golden, not burned.
- Create the egg mixture:
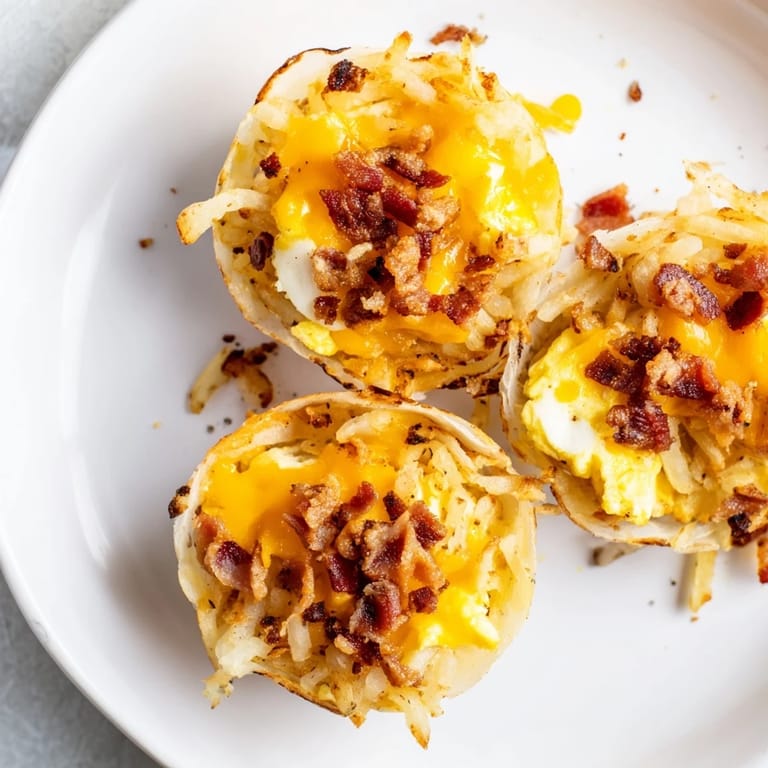
- Whisk your eggs with milk, then pour the mixture right into the skillet with the hash browns and let it cook gently, stirring occasionally, until it's just barely set. Fold in the cheese and bacon while everything is still warm, so the cheese gets a little melty and everything starts bonding together.
- Assemble the bites:
- Lay a tortilla flat, add about 2 heaping tablespoons of filling in the center, then roll it up tightly, tucking the ends in to create a little burrito. If you overstuff, they'll burst open while baking; if you underfill, they'll taste empty.
- Bake until golden:
- Place them seam-side down on your baking sheet, brush them lightly with melted butter or a quick spray of cooking spray, and bake at 400°F for 10-12 minutes until they're golden and the edges are crispy. They come out of the oven fragile but firm up as they cool slightly.
 Save to Pinterest
 The first time I served these to people who weren't expecting homemade tortillas, I watched their faces change when they bit through the crispy exterior into the warm, cheesy egg mixture. Someone asked if I'd bought them, which I know sounds silly to feel proud about, but it mattered because I'd made them. These breakfast bites became the thing I'd bring to potlucks and the thing my roommate would request when their parents were visiting, and somehow a Sunday morning experiment became proof that breakfast could be more than just cereal.
Make-Ahead Magic
The real gift of these breakfast bites is that you can assemble them the night before and just pop them in the oven while you're still figuring out how to be a human in the morning. I've kept them in the fridge for three days before baking, and they turn out just as golden and crispy as if I'd made them fresh. You can also bake them ahead and reheat them in a toaster oven for a few minutes—they don't dry out the way some breakfast foods do.
Variations Worth Trying
The beautiful thing about this formula is that it adapts to whatever's in your kitchen or whatever you're craving. I've made vegetarian versions with sautéed mushrooms and spinach, and they're just as satisfying as the bacon version. Jalapeños, chives, hot sauce, salsa—they all find their way into the filling once you realize you're not locked into one specific way of doing this.
Serving and Storage Tips
Serve these warm, preferably within a few minutes of coming out of the oven when the cheese is still a little creamy and the tortilla is still flexible. They do cool down a bit as they sit, which is fine; they're still delicious, just less dramatic. A dollop of sour cream or salsa on the side turns them into something people will actually want to eat, not just grab on the way out.
- Store leftovers in an airtight container in the fridge for up to four days, and reheat gently in a toaster oven to keep the exterior crispy.
- If you're making these for a crowd, the tortillas and filling can be prepped separately the day before, then assembled and baked fresh in the morning.
- A little extra melted butter brushed on before baking creates that golden, crispy exterior that makes people ask for the recipe.
 Save to Pinterest
 These breakfast bites became my proof that homemade food doesn't have to be complicated to feel special. Something about wrapping your own filling in a tortilla you've actually rolled out yourself makes breakfast feel like an accomplishment instead of just something you ate before work.
Questions & Answers
- → How should I prepare the homemade tortillas?
Mix flour, salt, oil, and warm water to form a soft dough. Divide, roll into thin circles, and cook on a hot skillet until lightly browned but still soft.
- → Can I make these bites vegetarian?
Yes, simply omit bacon or substitute with sautéed mushrooms or veggie sausage for a meat-free version.
- → What is the best way to get crispy hash browns?
Cook thawed shredded hash browns in butter over medium heat, stirring occasionally until golden and crisp.
- → How do I assemble the bites for baking?
Place a portion of the egg, bacon, and cheese mixture in each tortilla, roll tightly, brush with melted butter, and bake until golden.
- → Can these bites be stored and reheated?
Yes, they can be made ahead and reheated in a toaster oven or microwave for convenience.
- → What are good accompaniments for serving?
Salsa or sour cream pairs well to add a fresh and tangy contrast to the rich bites.