 Save to Pinterest
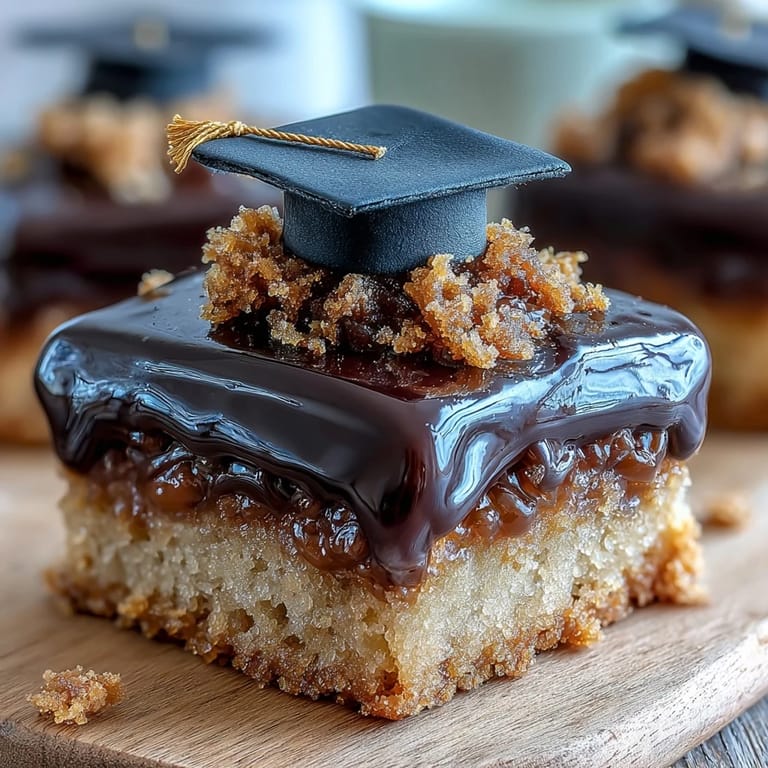
 Last spring, I stood in my kitchen watching my niece flip through graduation announcements, and suddenly I thought: why give a gift card when you could send something that tastes like celebration? These sugar cookies with fondant mortarboards became my answer, and now they're the thing people actually remember from her party. There's something magical about biting into a soft, buttery cookie only to discover a tiny fondant cap perched on top like a secret joke between you and the baker.
I'll never forget rolling out fondant at midnight before my cousin's celebration, humming off-key while shaping tiny mortarboards under the kitchen light. My partner walked in, saw the black fondant squares everywhere, and asked if I was decorating cookies or building a tiny fondant village. By the time I'd finished, the counter looked like a graduation ceremony had exploded across it, but when those cookies were boxed up and delivered, the smile on my cousin's face made every sticky fingernail worth it.
Ingredients
- All-purpose flour (2 1/2 cups): The foundation of everything—make sure yours is fresh, as old flour can make cookies tough instead of tender.
- Unsalted butter (1 cup): Room temperature is non-negotiable here; cold butter won't cream properly and you'll lose that fluffy texture that makes these special.
- Granulated sugar (1 cup): This sweetness pairs perfectly with the slight saltiness of the butter, creating balance.
- Large egg (1): Binds everything together and adds richness without overwhelming the delicate vanilla flavor.
- Pure vanilla extract (2 teaspoons): Don't skimp on quality here—real vanilla extract makes a noticeable difference in the final taste.
- Baking powder (1/2 teaspoon): Just enough to give the cookies a tender crumb without making them cake-like.
- Salt (1/2 teaspoon): Enhances sweetness and adds complexity that keeps people reaching for another cookie.
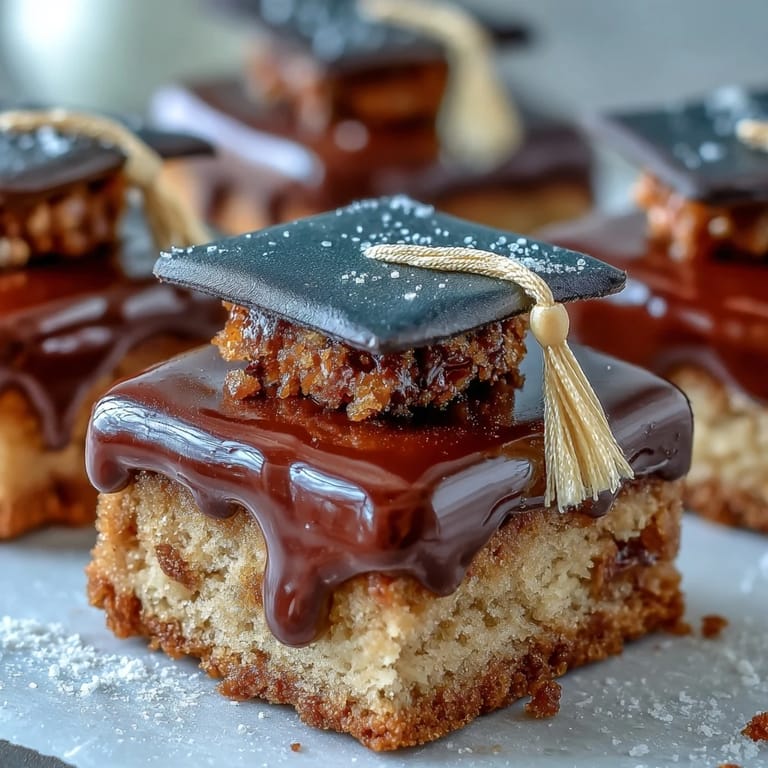
- Black fondant (8 oz): The star of the show—this becomes your mortarboard tops and creates an instant visual impact.
- Yellow fondant (1 oz): Tiny tassel details that transform plain cookies into celebration-ready treats.
- Powdered sugar (1 cup) and milk (1-2 tablespoons): Your edible glue that holds everything in place while looking elegant.
Tired of Takeout? 🥡
Get 10 meals you can make faster than delivery arrives. Seriously.
One email. No spam. Unsubscribe anytime.
Instructions
- Get your oven ready and prepare the stage:
- Preheat to 350°F and line your baking sheets with parchment paper—this prevents sticking and ensures even browning on the bottom.
- Combine your dry ingredients:
- Whisk together flour, baking powder, and salt in a medium bowl, making sure everything is evenly distributed so you don't end up with pockets of baking powder that taste metallic.
- Cream butter and sugar until clouds form:
- Beat them together for 2-3 minutes until the mixture turns pale and fluffy, almost like soft serve ice cream—this is where air gets incorporated and magic happens. You'll notice the texture completely transform from grainy to silky.
- Add egg and vanilla with intention:
- Beat them in thoroughly so they're fully integrated, then pause for a moment to appreciate how glossy everything looks.
- Bring wet and dry together gently:
- Add the dry ingredients slowly while mixing on low speed, stopping as soon as everything comes together—overmixing develops gluten and leads to tough cookies. The dough should look smooth but not overworked.
- Roll and cut with confidence:
- On a lightly floured surface, roll dough to 1/4-inch thickness and cut into 2 1/2-inch rounds or squares—the shape matters less than consistency, since it helps them bake evenly.
- Bake until edges whisper they're done:
- Bake for 10-12 minutes until the edges just start turning golden but the centers still look slightly soft—they'll firm up as they cool. Remove them a touch early rather than late; nobody loves a hard cookie.
- Cool completely on a wire rack:
- This is crucial because icing won't stick properly to warm cookies, and you want everything set before decorating.
- Shape your fondant mortarboards:
- Roll black fondant thin and cut 24 small squares for the caps, then roll 24 tiny cylinders for the bases—think of the squares as tiny graduation hats and the cylinders as their chin straps. Yellow fondant gets rolled into ropes and cut into 1-inch pieces for tassels.
- Make your decorative icing:
- Mix powdered sugar with milk and vanilla until it reaches a smooth, spreadable consistency—it should be thick enough to hold shapes but soft enough to work with.
- Decorate with the care of an artist:
- Place a small dab of icing on each cookie, press down a black fondant square, tuck a cylinder underneath as the base, then attach a yellow tassel with another tiny dab of icing. Step back and admire your work—you're literally stacking edible architecture.
- Let everything set before sharing:
- Give it 20-30 minutes so the fondant adheres properly and your decorations won't slide around when the cookies are moved or packed.
 Save to Pinterest
 There's a moment when you place that tiny mortarboard on top of a perfectly baked cookie and suddenly it stops being dessert—it becomes a memory. My friend brought these to her law school celebration, and instead of just eating them, everyone gathered to take photos and toast to the graduate. Those cookies sat on the table long enough to become talking points, which is honestly the highest compliment any food can receive.
The Art of Fondant Without Fear
The first time I worked with fondant, I was convinced I'd destroyed it—it got sticky, it tore, I questioned my entire life. What I learned is that fondant responds to temperature and pressure the way dough does; it wants you to be confident but gentle. Working with cold hands helps, as does having cornstarch nearby like a safety net. Once you understand that fondant is forgiving and wants to cooperate, the whole process becomes less intimidating and more like play.
Making These Ahead (Your Secret Weapon)
Bake the cookies three days in advance and store them in an airtight container—they actually improve as flavors meld together. Shape your fondant decorations the day before and keep them in an airtight container as well, then assemble everything the morning of your event. This approach keeps you calm and prevents the midnight panic that comes with doing everything at once, plus you can taste-test as you go and adjust fondant sizes if needed.
Customization That Feels Personal
These cookies become instantly more meaningful when you match the fondant colors to school colors or add a tiny fondant plaque with initials. I've made versions where the tassel was gold instead of yellow, where the mortarboard was crimson, where tiny numbers were impressed into the base. The beauty is that the base recipe stays exactly the same while the decoration becomes a personalized love letter to whoever's graduating.
- Tint fondant with gel food coloring to match school colors rather than buying pre-colored versions, which gives you infinite options.
- Add extra details like fondant initials or numbers pressed into the mortarboard square to make them uniquely theirs.
- Package them in cellophane bags tied with ribbon in matching colors, and suddenly you've created gifts that feel expensive and intentional.
 Save to Pinterest
 Every cookie you make carries the weight of someone's achievement, and that's a beautiful thing to hold in your hands. Send them off knowing you've created something that tastes as good as it looks, and that's the truest celebration of all.
Questions & Answers
- → What type of fondant is used for decorations?
Black and yellow fondant are used to create the mortarboard caps and tassels, rolled thin for easy shaping.
- → Can the cookies be made ahead of time?
Yes, decorated cookies can be stored in an airtight container for up to five days without losing freshness.
- → Are there alternatives to homemade dough?
Store-bought sugar cookie dough can be used for convenience, and pre-colored fondant helps save time.
- → How thick should the dough be rolled?
Roll the dough to about 1/4-inch thickness before cutting shapes for even baking and texture.
- → What allergens should be considered?
These cookies contain wheat, eggs, and dairy, but substitutions like gluten-free flour and dairy-free butter are possible.
- → What is the best way to attach fondant decorations?
Use a smooth icing made from powdered sugar, milk, and vanilla as an adhesive to secure fondant pieces on cooled cookies.